Behringer Music Mixer 32-Channel, 16-Bus, 40-Bit Digital Mixing Console with Programmable MIDAS Preamps, Motorized Faders, 32-Channel Audio Interface and iPad Remote Control User Manual
-

2.0
Owner's of the Behringer Music Mixer 32-Channel, 16-Bus, 40-Bit Digital Mixing Console with Programmable MIDAS Preamps, Motorized Faders, 32-Channel Audio Interface and iPad Remote Control gave it a score of 2.0 out of 5. Here's how the scores stacked up:
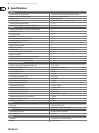
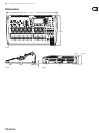


62 X32 DIGITAL MIXER Preliminary User Manual
7.12 Assign Screen
The assing screen allows setup for the 4 user-assignable rotary encoders and
eight user-assignable buttons. Using this screen, the console operator can assign
3 sets of 12 custom controls to be available for adjustment at all times.
The assign screen contains the following separate tabs:
Home: This screen provides a general overview of the 12 assigned controls for all
three control sets at the same time.
Set A: This screen allows assignment of dierent console parameters to the
12custom controls for set A.
Set B: Works as described above but for custom controls set B.
Set C: Works as described above but for custom controls set C.
7.12.1 Assign Screen: Home Tab
The assign screen’s “home” tab provides a visual overview of the 12 assigned
controls for all three sets at the same time.
The home tab oers visual feedback of the controls that have been assigned to
all three sets of custom controls, without having to bank between the three sets
one-by-one or relying on the abbreviated syntax shown in the custom control’s
dedicated LCD displays.
To adjust the various settings on the home tab, perform the following steps:
1. Rotate any of encoders 1-5 to move screen focus to the dierent custom
assignable encoders and buttons in the A, B, and C sets. The controls
currently selected with each of the four encoders are highlighted with a
green outline.
2. Tap any of encoders 1-5 to switch to the edit screen for the specic custom
control that was highlighted on the home tab screen.
7.12.2 Assign Screen: Set A Tab
The “Set A” tab allows mapping of specic console parameters to the 8 assignable
buttons and 4 assignable rotary encoders. Using this screen, the user can map
the exact parameters that are most useful to them to the desired controls, in the
desired order.
To adjust the various settings on the set A tab, perform the following steps:
1. Adjust the 1st encoder to select the color used for the LCD screens within that
set.
2. Adjust the 2nd encoder to select which of the 12 assignable controls in set A
you wish to map a parameter to. Choices include encoders 1-4 and buttons
5-12.
3. Adjust the 3rd encoder to scroll through a list of parameter categories
that the selected assignable control can be mapped to. Choices for the
buttonsinclude:
• Not Assigned
• Jump to Page
• Mute Channel
• Inserts
• Eect button
• MIDI
• Remote
Choices for the encoders include:
• Not Assigned
• Panorama
• Sends
• Dynamics
• FX Parameters
• MIDI
• Remote
4. Tap the 3rd encoder to assign the selected.
5. Adjust the 4th encoder to scroll through a list of parameters that can be
mapped to the currently selected assignable control.
6. Tap the 4th encoder to assign the selected parameter.
7. Adjust the 5th encoder to select from additional parameters that can be
mapped to the assignable controls.
Assign Screen: Set B Tab and Set C tabs
The Assign screen’s “Set B” and “Set C” tabs works as described above, but are
used to congure the set B and set C controls instead of the set A controls.


Find Your Products By Category
Please Login
