Behringer Music Mixer 32-Channel, 16-Bus, 40-Bit Digital Mixing Console with Programmable MIDAS Preamps, Motorized Faders, 32-Channel Audio Interface and iPad Remote Control User Manual
-

2.0
Owner's of the Behringer Music Mixer 32-Channel, 16-Bus, 40-Bit Digital Mixing Console with Programmable MIDAS Preamps, Motorized Faders, 32-Channel Audio Interface and iPad Remote Control gave it a score of 2.0 out of 5. Here's how the scores stacked up:

12 X32 DIGITAL MIXER Preliminary User Manual
2. Callouts
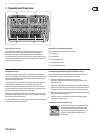
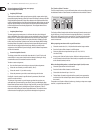
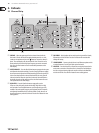
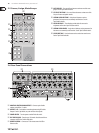
2.1 Channel Strip
VIEWVIEWVIEWVIEW
VIEW
VIEW
VIEW
(3)
(6)
(4)
(2)
(5)
(1)
(1) PREAMP – Adjust the preamp gain for the selected channel with the
Gainknob. Press the 48 V button to apply phantom power for use with
condenser microphones and press the button to reverse the channel’s
phase. The meter displays the selected channel’s level. Press the Low Cut
button and select the desired high-pass frequency to remove unwanted
lows. Press the View button to access more detailed parameters on the
MainDisplay.
(2) GATE/DYNAMICS – Press the Gate/Ducker button to engage the noise gate
and adjust the threshold accordingly. Press the Comp/Exp button to engage
the compressor and adjust the threshold accordingly. When the signal level
in the meter drops below the selected Gate threshold, the noise gate will
silence the channel. When the signal level reaches the selected Dynamics
threshold, the peaks will be compressed. Press the View buttons to access
more parameters on the Main Display.
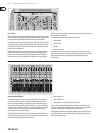
(3) EQUALIZER – Press the Equalizer button to engage this section.
Selectone of the 4 frequency bands with the High, High Mid, Low Mid,
and Low knobs. Press the Mode button to cycle through the types of EQ
available. Selectthe specic frequency to be adjusted with the Freq knob,
andadjust the bandwidth of the EQ with the Q knob. Finally, boost or cut
the selected frequency with the Gain knob. Press the View button for more
editingoptions.
(4) BUS SENDS – Quickly adjust the bus sends by selecting one of the 4 banks,
followed by one of the 4 knobs. Press the View button for more detailed
editing and routing.
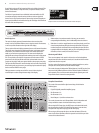
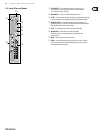
(5) USB RECORDER – Connect a thumb drive to install rmware updates and to
record performances. See the Topic Guide section for details.
(6) MAIN BUS – Press the Mono Bus or Stereo Bus to assign the channel to the
main mono or stereo bus. When Stereo Bus is selected, the Pan/Bal adjusts
the left-to-right positioning. Adjust the overall send level to the Mono Bus
with the Level knob. Press the View button for more editing options.


Find Your Products By Category
Please Login
