Behringer Music Mixer 32-Channel, 16-Bus, 40-Bit Digital Mixing Console with Programmable MIDAS Preamps, Motorized Faders, 32-Channel Audio Interface and iPad Remote Control User Manual
-

2.0
Owner's of the Behringer Music Mixer 32-Channel, 16-Bus, 40-Bit Digital Mixing Console with Programmable MIDAS Preamps, Motorized Faders, 32-Channel Audio Interface and iPad Remote Control gave it a score of 2.0 out of 5. Here's how the scores stacked up:


32 X32 DIGITAL MIXER Preliminary User Manual
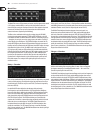
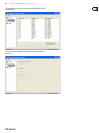
5.15 Remote control
The X32 hosts an Ethernet port on its rear panel which can be used to connect
and remote control it over a network via the XiControl on an iPad or the X-remote
application on a PC. To be able to do this the X32 has to be set up properly.
• Press the SETUP button next to the screen.
• Go to the Network tab.
• Use encoder 1 to choose between IP address, Subnet mask and Gateway.
Adjust the address elds with the encoders 2-5 and assign the selected
numbers with encoder #6.
• Set an IP address which ts your network, normally 192.168.0.X.
The IP address should be free within the network.
• Set your subnet mask according to your network,
normally255.255.255.0
• Set your gateway, if required.
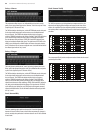
Now get your iPad or remote PC into the same network and open the X-Remote.
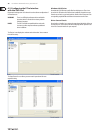
PC:
• On the X-remote, choose setup on the right side and the network tab.
Enter the IP address of the X32 in the network and press connect.
• If the software has connected to the X32 you can also synchronize them
in 2 directions. Console -> PC means all settings in the X32 will be
loaded into the X-Remote. PC -> Console means that all settings in the
X-Remote will be written to the console.
XiControl:
• For the XiControl remote, open the program on your iPad (make sure the
iPad is connected to the same network as the console).
• On the startup screen, a popup should appear. Enter the IP of the
console, press “Go Online”, et voilà: you are connected and can control
the X32 with your iPad.
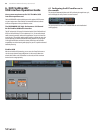
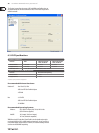
5.16 Recording a 2-track directly with
theconsole
The X32 oers the possibility to record a 2-track of your mix (or any other
selection of signals) directly onto a USB-stick/external USB hard disk:
• Plug a FAT-formatted (FAT12, FAT16, FAT32) USB stick into the USB port
next to the main display.
• Press the VIEW button next to the USB port and the home screen of the
recorder will show up with a nice emulation of an old tape deck.
• On the cong tab you can select the source for the recording, default is
main L and R.
• Press RECORD (encoder #5) to record your mix.
• To adjust the volume during playback, press the AUX IN / USB FX RETURN
button next to the fader section and adjust the volume with the AUX
7/8faders.
Remarks:
Due to the FAT format of the stick, the le size will be limited to 2 GB, which is
about 3 hours of stereo recording. Please test the recording capability of your USB
device before you do the “real stu” as some sticks may not be supported or be
too slow. We also recommend you defragment your USB device prior to recording.
The recording will be done as 16-bit WAV le with the selected sample frequency
of the console.
Please also note that it is possible that the specications of USB storage devices
may be changed by the manufacturer without any change in physical appearance
or notication.
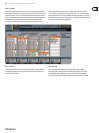
5.17 Saving and recalling scenes
Follow the steps below to save and recall scenes in the console, allowing dierent
congurations to be recalled at a later time.
• Adjust all settings of the console so that all elements of the mix are
asdesired.
• Press the “view” button located in the top panel’s “Scenes” section. The Main
Display will show various controls for saving and recalling console scenes.
• Press the rotary control labeled “save” to save the console’s current
conguration to the next available empty scene and label it with a
customname.
• Adjust the console to the next desired conguration, and repeat the process
above as needed, saving additional scenes to additional empty slots.
• To recall a scene, use the “prev” and “next” buttons, located in the top
panel’s Scenes section, to navigate the scene list to the desired scene on the
Main Display.
• When the desired scene is highlighted in the scenes list on the Main Display,
press the red “GO” button and the console will switch to the highlighted
scene. All console parameters will switch to the state they were in when
saved to the scene that was just recalled.


Find Your Products By Category
Please Login
