
0
Owner's of the Mackie Video Game Controller Mackie Video Game Controller gave it a score of 0 out of 5. Here's how the scores stacked up:
4
Mackie Control Universal
Mackie Control Universal
Changing Modes
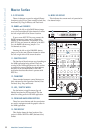
MCU Pro
has three different modes of
operation:
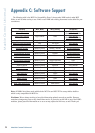
1. Mackie Control (use with most DAWs. See
Appendix C on page 12
).
2. Logic Control (use with Apple Logic).
3. HUI (use with Avid Pro Tools, including HD,
LE, and M Powered versions).
When first turning on the
MCU Pro
, the display
prompts you to select a mode of operation:
• Press Ch. 1 V-Pot to select Mackie Control.
• Press Ch. 4 V-Pot to select HUI.
• Press Ch. 8 V-Pot to select Logic Control.
Once the selection has been made, MCU Pro
will automatically boot into the selected mode
each time it is powered up.
To change the mode of operation:
1. Turn off the Mackie Control.
2. Hold down both the Ch. 1 and Ch. 2 SELECT
buttons while turning on the Mackie Control.
3. The display once again prompts you to select a
mode of operation.
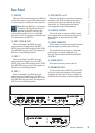
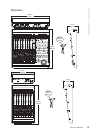
Installation
There are two methods for connecting the
MCU Pro
to a computer: USB and MIDI.
Note: The USB method is the preferred method
because all of the MIDI ports on the MCU
Pro are
available. If using MIDI cables to connect the
MCU Pro to a computer via third-party MIDI
interface, the other two MIDI ports (3 and 4) on
the MCU Pro are inactive.
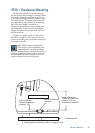
Connecting with USB
• Connect the
MCU Pro
to
a computer with a
USB cable (see “Hookup
1: USB” on page 6).
The USB connection works with both
Macintosh and PC platforms and is “plug and
play” (no driver installation required!).
Connecting with MIDI
• Connect the
MCU Pro
to the MIDI interface via
two MIDI cables (IN and OUT). Use the MIDI
2 (MAIN) MIDI connections on the MCU Pro.
• Connect the third-party MIDI interface to the
computer as described by the manufacturer
(see “Hookup 2: MIDI” on page 6).
For both methods:
• Connect one end of the external power supply
to the MCU Pro, and the other end to an
AC power source between 100 VAC and
240 VAC (50–60 Hz).
• Turn on the MCU Pro POWER switch.
• Launch the software program of choice.
• Select your software’s console or surface
manager set up window.
• Select the Mackie Control in the MIDI device
setup section of your DAW application.
• Once the Mackie Control is selected within
your software’s setup preferences, the unit(s)
will be recognized automatically.
•
MCU Pro / MCU XT Pro
units may function
as a single large console – a “Control Surface
Group.”
• Go to the MCU Pro software section on our
website (www.mackie.com/products/mcupro/
mcupro_software) for details on using the
MCU Pro with your particular application.
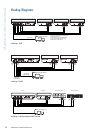
To connect one or more MCU XT Pros:
1. If using the USB method to connect the MCU
Pro to a computer, then the MCU Pro has
three sets of MIDI IN/OUT connectors for con-
necting additional MCU XT Pro units. Always
connect MIDI OUT from one unit to MIDI IN
on the next unit (and MIDI IN to MIDI OUT).
2. If using the MIDI method to connect the MCU
Pro to a computer, then connect the MCU XT
Pro to the external USB MIDI interface [the
MIDI 3 and MIDI 4 connectors on the MCU
Pro are not functional using this method].
Connect the MIDI OUT from the MCU XT Pro
to the MIDI IN on the MIDI interface (and
MIDI IN to MIDI OUT).


Find Your Products By Category
Please Login
