

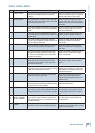
4.1
Owner's of the Mackie Music Mixer ProFX12 gave it a score of 4.1 out of 5. Here's how the scores stacked up:

33
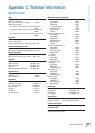
Owner’s Manual
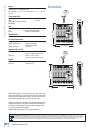
Owner’s Manual
Monitoring
When recording to computer software with a ProFX
mixer, use direct hardware monitoring:
• Listen to the track you are recording directly off
of your mixer, while also listening to previously-
recorded tracks on your DAW software, as they
are fed back into the mixer.
The procedure is as follows:
• Arm the track you wish to record onto, on your
DAW software, such as Tracktion.
• On the track you have just armed, disable input
monitoring (see top of next page), so that
while recording, you do not hear the return
of that track coming from the computer. This
will ensure you do not mix the direct track you
are monitoring, with the duplicate of the track
on the DAW as it is being recorded. You do not
want to hear the direct and DAW track of the
same source simultaneously, as the DAW ver-
sion might be slightly delayed, and the combi-
nation of the two will produce a fi ltered sound.
• Make sure that the DAW’s input meters show
a healthy level, and if it needs to be increased
or decreased, adjust the signal’s channel fader
[31], not the gain knob [20].
• Press record on the DAW and record the track.
Overdubbing
To overdub additional tracks while listening to previ-
ously recorded ones, follow these steps:
• Press Play. The previously recorded track will
now play out of the DAW’s main L-R mix into
the USB input of the mixer.
• Set the level of the USB input level knob [40]
to a level where you can hear the previously
recorded track comfortably.
• Arm a new track in the DAW software, be sure it
has input monitoring disabled (see top of next
page), and record the new track on your DAW.
• While recording the new track, you will hear
the previously recorded tracks coming into
the mixer’s USB input, while you simultane-
ously hear the current track you are recording
directly through the mixer hardware.
• Repeat these steps until you have built up all
the tracks of your recording.
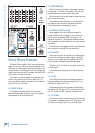
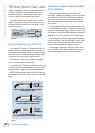
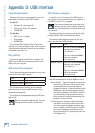
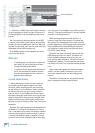
The mixer's built-in USB connection allows overdub
style recording to a Mac or PC digital audio workstation
(DAW) through the USB cable.
Here are some steps showing how to record a fi rst
track, and then record additional tracks while monitor-
ing ones that have already been recorded.
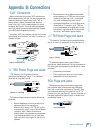
1. Connect to the mixer, the sound source you
wish to record to your audio software, for ex-
ample:
• A microphone for a voice or instrument.
• A line-level source such as an electronic
keyboard.
• An instrument connected directly to the
instrument input 1 (with the hi-z switch
[7] pressed in).
2. Make sure the USB thru switch [41] is not
pressed in. This will ensure that during each
recording pass, the audio software only receives
the track-in-progress as an audio signal, and
not the pre-existing mix from the computer as
well.
3. Set the gain knob [20] at the top of the channel
you are using, to an appropriate level for the
source being recorded, using the level set LED
[21] as a guide. Once the gain has been set, set
the channel fader [31] to unity (U).
The signals going out to your computer are not
affected by the main fader [48] or the head-
phones knob [42].
4. If you are recording an acoustic source through
a microphone, monitor it through headphones,
not through speakers. This will prevent sound
from the speakers from leaking into the micro-
phone. If working in this fashion, turn down
the main fader, and instead turn up the phones
knob for safe listening levels in the head-
phones.
Recording with USB


Find Your Products By Category
Please Login
